How to Install a Stratus Lantern Rooflight
Watch our step-by-step Stratus Lantern installation video and learn how to fit aluminium roof lanterns professionally. Ideal for trade and DIY installers.
This video provides a step-by-step walkthrough of how to install a Stratus aluminium roof lantern, including unpacking, assembling the ridge bar, fixing the eaves frame, and fitting the glazing. Whether you're a professional installer or an experienced DIYer, this guide will help ensure your lantern is installed quickly, safely, and to a high standard.Our roof lanterns are designed for ease of installation and come complete with clear instructions and all necessary fixings. Each product is manufactured in the UK using high-grade aluminium and thermally broken frames to improve energy efficiency.
Our easy to follow fitting guide is below. Prefer a printed copy? Download this guide as a pdf here:
Download Installation Guide
Step-by-Step Stratus Lantern Installation Guide

1
Ensure supporting construction is square by checking diagonals. Measurements to be taken to outside corners of supports.The customer must ensure that the kerb and surrounding roof can adequately resist the horizontal spread of the lantern.

2
Apply a generous bead of suitable sealant around the full perimeter of the supporting structure. Positioned as shown.

3
Secure eaves beam into supporting upstand using appropriate fixings. Fixings to be positioned as shown in diagrams 3 and 4.

4
Sealant to be applied between intersection of eaves beams at corner joint using appropriate product.


5

6
Fit glazing bars to eaves beam and ridge section in sequence shown. DO NOT fully tighten fixing bolts to allow fitting of hip rafters. Secure glazing bars and Georgian hips to eaves beam and ridge using MS x 16mm bolts (supplied in the eaves beam). Fully tighten fixing bolts to secure.
Fit Georgian hip bars to eaves beam and ridge section in sequence shown. When all sections are in correct position check they are square to eaves beam and ridge and tighten to fix in position. Fit central glazing bars to eaves beam and ridge section in sequence as per diagram if required.

7
Secure all rafters and hips to eaves beam using M5 x 16mm bolts
Tip: If working with a restricted supporting upstand height you may need to loosely fir the end caps in place prior to the glazing bars being secured to assist assembly. If not glazing bar end caps will be fitted later in the process.
8

Rafters will need fitting with a gentle rotation to fit over bolts when fixing to ridge. Take care when positioning, not to scratch powder coated surface of ridge.

10

Ensure that support infill is fitted between all glazing bars and Georgian hips. Fold back approx. 25mm of protective tape from support infill to allow it to be removed once glazing unit is in the correct position.
When attaching the glazing closers on a comtemporary design roof, it is advisable to seal the closer to the DGU to prevent the possibility of any central sagging to the end closer.
12
9
Fix hips to radius end using M5 x 16mm bolts.

11
Use this sequence to glaze the units in their correct locations to balance weight evenly.

13
Top caps are located into their respectively numbered glazing bar. Tap down till fully located using a plastic or rubber mallet on a section of timber to avoid damage to capping.
Apply a thin bead of sealant to the top wing of the glazing closer and attach. Secure with suitable masking tape and remove when cured.

14
Seal glazing bar and top cap to ridge section using appropriate sealant.

16
Sealant to be applied as indicated on this image to seal glazing bars and hip rafters up to radius end foam infills.
15
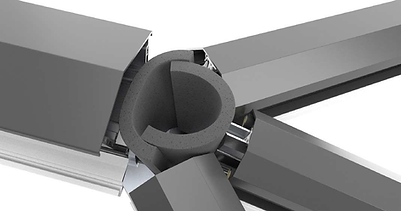
Now fit the radius end foam infills. They fit back to back as shown below.

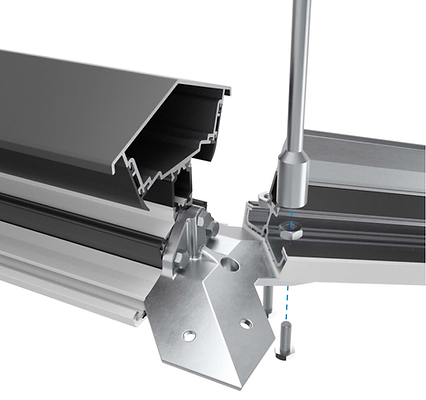
Insert ridge holding bolt into receiving boss on underside of top cap casting.
Turn clockwise and lock in position. When fully tightened cut down to 85mm from end of threaded rod to edge of aluminium boss.
17

18

Sealant to be applied to the underside of the top aluminium boss as indicated on this image.

20
Secure end caps on all glazing bars and Georgian hip rafters using 4.2 x 25mm self tapping screws (as supplied).

19
Fit top caps. Ensure gap between hip and ridge is sealed when no rafter is fitted.
21

Drill 8mm diameter hole in bottom cap for nylon fixing bolt to pass through. Position indicated on inside of cover. Secure using M8 nylon nut.
Frequently Asked Questions
Do I need a professional to install the lantern?
While most competent DIYers can install our Stratus Lanterns, we would recommend professional installation for best results, especially for larger rooflights.
What size upstand do I need?
We recommend a 100mm wide x 150mm high upstand to ensure proper drainage and sealing of the lantern frame.
Can I install the lantern in wet weather?
Installation should always be done in dry conditions to ensure safe working and effective sealing of the product.
Is the installation guide suitable for all sizes?
Yes — the process is consistent across all sizes. You’ll just need a second pair of hands for larger units!
Tools required:
-
Tape Measure
-
Drill and bits as required
-
Rubber or plastic mallet
-
Screwdriver and 8mm nut runner or socket
-
Sealant gun and sealant*
-
Hacksaw
Please ensure sealant used is suitable for self cleaning glass!

Whether you're a trade professional fitting multiple units or a homeowner looking for guidance on a DIY roof lantern install, our expert team is here to help.
Call us on 01782 593968 for free advice on:
-
Roof lantern installation tips and technical guidance
-
Choosing the right size and glass spec for your project
-
Understanding upstand requirements (100mm x 150mm recommended)
-
Downloading full fitting instructions and documentation
Prefer to email? Reach out at enquiries@contechconservatories.co.uk
✔ Free Nationwide Delivery
✔ Made-to-measure aluminium roof lanterns
✔ Fast lead times and full UK support
Ready to order?
Browse our full range of thermally efficient, easy-to-install Stratus aluminium roof lanterns.

Request a Quote
Not too sure on what to order? Fill out the form below and we will be happy to help!
